 Back to Contents

OSX has a built-in facility to allow communication via MIDI over a network.
INSTALLATION
In Pianist Pro, on the 'MIDI CONTROL' panel, tap 'TYPE' until the word 'NETWORK' appears. Then tap the 'ON' button. This will enable a Network MIDI server on your iPad.
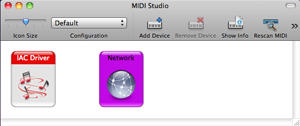
Next, on your Mac, ensure you are on the same wireless network as your iPad and run the 'Audio MIDI Setup' application, which can be found in '/Applications/Utilities/'. Then select from the menu: 'Window/Show MIDI Window'. The following window should appear:

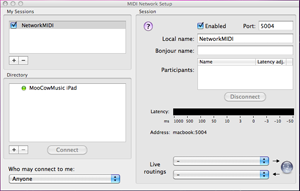
Double click on the "NETWORK" icon. The following window should appear:

Don't worry about configuring this screen for now, other than ensuring that 'Enabled' is ticked. If you have set up a network server in Pianist Pro then you should see the name you gave your iPad in iTunes appear under 'Directory'. Select this row and press 'Connect'. On the right under 'Participants' you should now see your iPad name appear, showing that you are connected. Pianist Pro will also pop up a message box informing you of the connection.
In your chosen MIDI software, you can now connect to your iPad by selecting the MIDI port with the name that you gave to the Session on the MIDI Network Setup dialog. This defaults to 'Session 1', but you can rename it to anything you like. Here we have called it 'NetworkMIDI'.
To disconnect from Network MIDI, the simplest method is to go to the Pianist Pro 'MIDI CONTROL' panel and disable the 'ON' button. This will close the Network MIDI server and disconnect any attached clients.
Network MIDI, and OSX MIDI drivers in general, provide the user with many configuration possibilities. For more information and technical support you can press the ? button on the 'MIDI Network Setup' window, or see Apple's comprehensive online documentation.
IMPROVING LATENCY
As with other wireless MIDI methods, latency can be improved by setting up a 'Computer-to-Computer Network'. Please see the 'IMPROVING LATENCY' section under OSC or DSMI for more information.
 Back to Contents
INSTALLATION
In Pianist Pro, on the 'MIDI CONTROL' panel, tap 'TYPE' until the word 'NETWORK' appears. Then tap the 'ON' button. This will enable a Network MIDI server on your iPad.
Next, on your Mac, ensure you are on the same wireless network as your iPad and run the 'Audio MIDI Setup' application, which can be found in '/Applications/Utilities/'. Then select from the menu: 'Window/Show MIDI Window'. The following window should appear:

Double click on the "NETWORK" icon. The following window should appear:

Don't worry about configuring this screen for now, other than ensuring that 'Enabled' is ticked. If you have set up a network server in Pianist Pro then you should see the name you gave your iPad in iTunes appear under 'Directory'. Select this row and press 'Connect'. On the right under 'Participants' you should now see your iPad name appear, showing that you are connected. Pianist Pro will also pop up a message box informing you of the connection.
In your chosen MIDI software, you can now connect to your iPad by selecting the MIDI port with the name that you gave to the Session on the MIDI Network Setup dialog. This defaults to 'Session 1', but you can rename it to anything you like. Here we have called it 'NetworkMIDI'.
GarageBand does not allow you to choose MIDI ports, but should automatically pick up all available ports as they appear.
To disconnect from Network MIDI, the simplest method is to go to the Pianist Pro 'MIDI CONTROL' panel and disable the 'ON' button. This will close the Network MIDI server and disconnect any attached clients.
Network MIDI, and OSX MIDI drivers in general, provide the user with many configuration possibilities. For more information and technical support you can press the ? button on the 'MIDI Network Setup' window, or see Apple's comprehensive online documentation.
IMPROVING LATENCY
As with other wireless MIDI methods, latency can be improved by setting up a 'Computer-to-Computer Network'. Please see the 'IMPROVING LATENCY' section under OSC or DSMI for more information.
 Back to Contents