 Back to Contents

An arpeggiator automatically steps through a sequence of notes based on an input chord. Holding down a Cmaj chord (CEG), an arpeggiator might output the following sequences, depending on the mode-
UP - C, E, G, C, E, G ...
DOWN - G, E, C, G, E, C ...
UP / DOWN - C, E, G, E, C ...
RANDOM - C, G, G, C, E, G, E ...
PATTERN - (see below)
In Pianist Pro, the arpeggiator is enabled by pressing the ARP button on the piano screen.
Controls for the arpeggiator are found in the Piano Settings screen-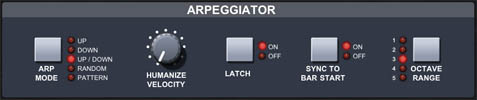
ARP MODE - Switches between the various arpeggiator modes.
HUMANIZE VELOCITY - The higher this dial is set, the more randomness is introduced into the velocity (volume) of the notes played by the arpeggiator. This is more useful on analog instruments such as pianos than on synths.
LATCH - The Arpeggiator Latch enables the arpeggiator to remember the last set of keys played on the keyboard. When enabled, the arpeggiator sequence will continue to play even after the keys have been released. Once all keys are released, the next chord to be played will clear the latch memory and only the newly played chord will be arpeggiated. To stop the arpeggiator with the latch enabled, press the Arp button.
SYNC BAR - For arpeggiator modes other than Pattern, this syncs the sequence of notes to restart at the start of each bar.
OCTAVE RANGE - This determines how many octaves are used by the arpeggiator in modes other than Pattern.
A great feature of arpeggiators is the ability to change the input chord while the sequence is playing. Not only does this mean changing key or from a minor to a major chord, but also subtle changes such as adding or removing a note from the chord. With a little practice you can achieve very complex sounding arpeggios merely by holding a chord and periodically lifting and pressing keys in that chord.
DUAL KEYBOARD MODE
In Dual Keyboard mode, only the upper keyboard will control the arpeggiator (in any mode other than PATTERN). The lower keyboard is free to add additional chords or notes over the top of the arpeggio.
PATTERN ARP MODE
Pianist Pro introduces a new type of arpeggiator mode: the 'Pattern Arp'. This mode still takes an input chord and outputs a sequence of notes, but the sequence can be much more complex than the other modes. To select the Pattern Arp, select PATTERN for the ARP MODE in Piano Settings. You can select or edit the pattern that the arpeggiator uses by tapping:

SELECTING A PATTERN
 The Arp Pattern editor gives you two initial choices, displayed at the top of the dialog: PRESET or USER. Tap on one to choose it. In Preset mode you can select from a number of presets in the scrollbox. Once selected the Pattern Arp will immediately start using the new preset.
Unlike the Piano Settings screen where you can audition other modes of the arpeggiator by holding the 'Audition' button, there is no in-built way to audition a pattern from this dialog. This is because patterns can be defined for specific chords or key combinations and user experimentation often provides far more interesting results than just auditioning the same major chord. We would advise initially experimenting with each pattern by playing keys on the piano screen, and ultimately using the 'USER' mode to examine the pattern sequence.
EDITING A PATTERN
To edit a pattern, or create one from scratch, tap the USER button at the top of the Pattern Arp dialog.
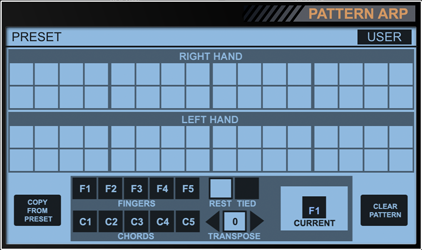
This screen operates in a similar way to the Drummer screen, in that you can modify steps of a 16 step per bar sequence by 'drawing' with a CURRENT value. However, the Pattern Arp differs from the Drummer sequencer in two ways:
- The sequence is two bars long instead of just one.
- There are two separate sequences that are played back simultaneously, one for the 'left hand' and one for the 'right hand'.
Let's examine these differences in more detail.
We use two bars instead of one as a compromise between artistic freedom (patterns of any length) and simplicity of design. Two bars allows you to create patterns that are less repetative and mechanical than a single repeating bar. In the Pattern Arp editor the bars are laid out with the first bar at the top and the second bar immediately underneath it. So the pattern plays from left to right across the top row, and then jumps to then next row down and plays from left to right again.
We have patterns for the left and right hands to emulate a common style of playing the piano where the left hand plays bass notes while the right hand plays chords. Having two patterns also allows us to have a bassline being played by the left hand, while the right hand plays a melody over the top. In the Pattern Arp editor the left and right hands are shown in separate areas, with the right hand above the left hand.
Below the left and right hand areas we have a shaded box where you choose the CURRENT value with which you want to 'draw' with in the pattern. (ie. When you tap in a square in the left hand or right hand zones, that square will change to whatever value you have selected in CURRENT).

Buttons to the left of CURRENT will affect its value-
F1 - Play the note pressed by Finger 1 (the leftmost finger on the keyboard).
F2 - Play the note pressed by Finger 2 (the next finger up on the keyboard).
F3 - Play the note pressed by Finger 3.
F4 - Play the note pressed by Finger 4.
F5 - Play the note pressed by Finger 5.
C1 - Play the chord pressed by fingers 1 and 2.
C2 - Play the chord pressed by fingers 1, 2 and 3.
C3 - Play the chord pressed by fingers 2, 3 and 4.
C4 - Play the chord pressed by fingers 3, 4 and 5.
C5 - Play the chord pressed by fingers 1, 2, 3, 4 and 5.
REST - Do not play a note.
TIED - If the step immediately following this one has the same value then instead of playing two short notes over the two steps, play one longer note that lasts for the duration of both steps. If the following note is different then two notes will be played as normal (since it makes no sense to tie two different notes together).
TRANSPOSE - Transpose the notes that are played back by a number of semitones. If this value is set to something other than 0 (no transpose) then the transpose value will be displayed at the top right of the step. This is most useful to introduce bass notes into your chord sequence by using a transpose value of -12 (one octave) or -24 (two octaves) for a single finger to play that note at a lower octave. A complex pattern of bass notes and chords can therefore be played by just holding down the chord. You can also transpose notes by fractions of an octave to build up a simple melody that contains additional notes to those being pressed, or even an entire bassline that can be played by pressing a single key.
If a step requires a finger that is not currently holding a key (eg. 'F3' when you are only holding down two keys) then the closest finger will be used instead (in this case 'F2'). In this way you can define a pattern that uses many fingers which can be both played by a single finger, and also additional finger presses can be added during playback to modify the arpeggiator output.
AN EXAMPLE
The following example shows the first 8 steps (half a bar) of a simple arpeggiator pattern:
FINGER 1, FINGER 2, FINGER 1, FINGER 3, CHORD 5 tied for 2 steps, REST, FINGER 1

By holding down a different chord, the notes that the arpeggiator plays will change, but the sequence of notes will not.
PLAYING LEFT AND RIGHT PARTS
The left and right parts of the pattern are ideally suited to the Dual Keyboard mode. In this mode the lower keyboard plays the left hand part while the upper keyboard plays the right hand part. With an appropriate pattern you can therefore modify the left and right hand arpeggios independently (eg. by holding down the left hand bassline, and dropping the right hand chord pattern into the song as appropriate). If a hand in the pattern contains no step data at all then the Pattern Arp will be disabled for that hand, allowing you to create patterns that are controlled by just the upper or lower keyboard, with the other keyboard free to perform manual notes over the top.
The Single Keyboard and Scale Piano modes both only control the right hand part, which is usually considered the lead part. What this means is that you can create a pattern with left and right hand components, then record the left hand (bassline) part with the Dual Keyboard lower keyboard, and then switch to the Scale Piano to control the lead part but within the confines of a scale.
COPY FROM PRESET
Use this button to copy the pattern data from the currently selected preset as a starting point for your own user patterns.
Back to Contents